Introduction
There are many framework in working with Artificial Neural Networks (ANNs), for example, Torch, TensorFlow. In this tutorial, we present a framework, Theano, to create and evaluate ANN models in Microsoft Windows Environment.
Content
- Prerequisites
- Your First Neural Network in Keras
- Convolutional Neural Network in Handwritten Digit Recognition
- References
- Contributors
- Contact
Prerequisites
In order to work with this example program, and also to know how Theano works, you need to have the following prerequisites:
- Microsoft Windows 10 (Build 1607), aka Windows 10 Anniversary Update or higher versions
- Bash on Ubuntu on Windows must be enabled [Readme]
- Keras with Theano backend in virtual Ubuntu on Windows must be installed [Readme]
- Basic understanding of Python programming language [Readme]
- Basic understanding of machine learning, artificial neural network [ML | ANN]
Your First Neural Network in Keras
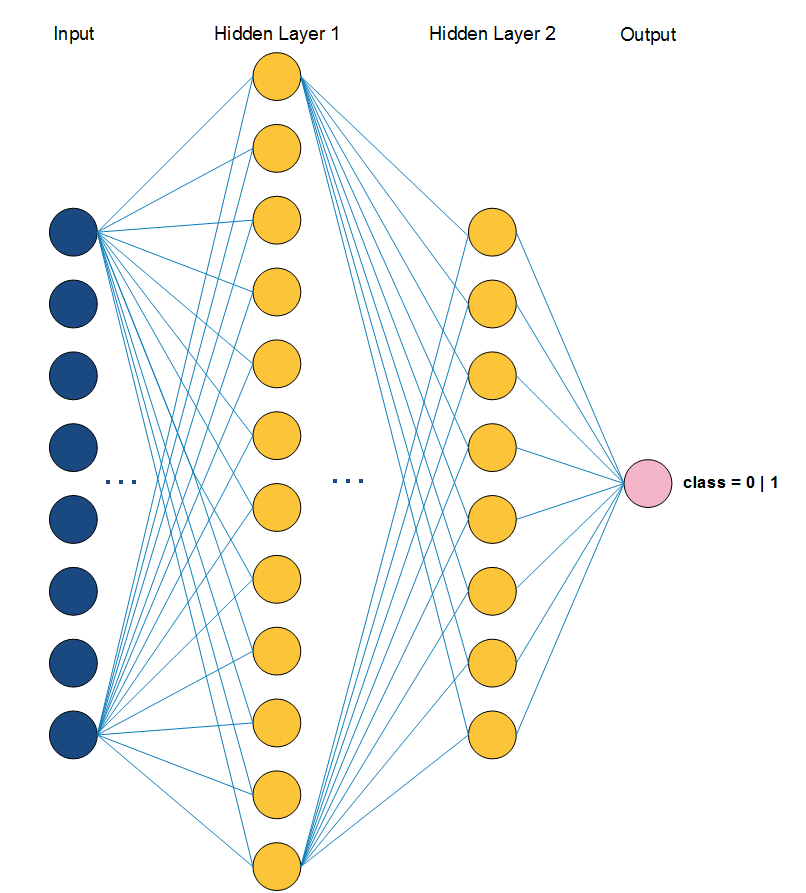
In the following Python program, you will go through the steps to build and evaluate an ANN model on the pima-indians-diabetes dataset. The program includes 5 main steps as follows:
- Loading dataset
- Defining model
- Compiling model
- Inputing dataset into model
- Evaluating model
                # create first network with Keras
                from keras.models import Sequential
                from keras.layers import Dense
                import numpy


                # fix random seed for reproducibility
                seed = 7
                numpy.random.seed(seed)


                # load pima indians dataset
                dataset = numpy.loadtxt("pima-indians-diabetes.csv", delimiter=",")


                # split into input (X) and output (Y) variables
                X = dataset[:,0:8]
                Y = dataset[:,8]


                # create model
                model = Sequential()
                model.add(Dense(12, input_dim=8, init='uniform', activation='relu'))
                model.add(Dense(8, init='uniform', activation='relu'))
                model.add(Dense(1, init='uniform', activation='sigmoid'))


                # compile model
                model.compile(loss='binary_crossentropy' , optimizer='adam', metrics=['accuracy'])


                # input the dataset into created model
                model.fit(X, Y, nb_epoch=150, batch_size=10)


                # evaluate the model
                scores = model.evaluate(X, Y)
                print("%s: %.2f%%" % (model.metrics_names[1], scores[1]*100))
 The above image illustrates the defined
 ANN model. After programming your prefer ANN model, now, compile and run it in Keras environment by using the following steps:
-
Open
Bash on Ubuntu on Windowsand change the directory to the project location. You need to put both the program and dataset in the same location. -
Type the command
workon keras -
Then,
python sample.py
Handwritten Digit Recognition
At this point, you completed your first beginning program with Keras. Now, let's dive into something interested, computer vision. We present a basic demo with Convolutional Neural Network (CNN) with handwritten digit recognition problem. The program is available at this repository, named mnist_cnn.py.
There are few standard datasets in digit recognition problem, thus, in this tutorial, we use the MNIST dataset, which contains 70,000 images of handwritten numbers from 0 to 9. The digit in each image has been size-normalized and centered in a fixed-size.
Like your first program, in this example, first, we need to read the input dataset. Each image is represented as matrix with 28 x 28 dimension. Next, we define size of pooling area for max pooling. Then, define the number of convolutional filters (feature detectors) to be used and the size of them also.
              # input image dimensions
              img_rows, img_cols = 28, 28
              # number of convolutional filters to use
              nb_filters = 32
              # convolution kernel size
              kernel_size = (3, 3)
              # size of pooling area for max pooling
              pool_size = (2, 2)
Second, we reshape all image to 28 x 28 dimension by calling the defined reshape function in Keras (in line 35). The function contains four arguments (samples, channels, height, width), where channels is 0 or 3, which means, gray-scale or RGB mode, respectively.Third, we define the CNN model as follows:
              # define model
              model = Sequential()

              model.add(Convolution2D(nb_filters, kernel_size[0], kernel_size[1],
                                      border_mode='valid',
                                      input_shape=input_shape))
              model.add(Activation('relu'))
              model.add(Convolution2D(nb_filters, kernel_size[0], kernel_size[1]))
              model.add(Activation('relu'))
              model.add(MaxPooling2D(pool_size=pool_size))
              model.add(Dropout(0.25))


              model.add(Flatten())
              model.add(Dense(128))
              model.add(Activation('relu'))
              model.add(Dropout(0.5))
              model.add(Dense(nb_classes))
              model.add(Activation('softmax'))


              # compile model
              model.compile(loss='categorical_crossentropy',
                            optimizer='adadelta',
                            metrics=['accuracy'])
Forth, after define the model, now input the dataset into it and then, run and evaluate. The nb_epoch affects the time-consuming when running this example, we recommend to edit nb_epoch to a lower number when running time is too long.
              # input the dataset
              model.fit(X_train, Y_train,
                        batch_size=batch_size,
                        nb_epoch=nb_epoch,
                        verbose=1,
                        validation_data=(X_test, Y_test))

              # evaluate model
              score = model.evaluate(X_test, Y_test, verbose=0)

              print('Test score:', score[0])
              print('Test accuracy:', score[1])
References
- Keras Documentation - https://keras.io/
- Machine Learning Mastery - https://goo.gl/2EovtJ
Contributors
- Phuc Duong - [email protected]
- Luan Vuong (Student) - [email protected]
Contact
This tutorial may contain mistakes, please feel free to send us your feedback via email!